From the future: I originally intended to make this Master Bedroom reno like the other project pages but as I got into the planning I saw that this was going to be several huge projects going on simultaneously and that it would involve three rooms and the common hall. It was going to be too large for a single page so I decided to present this is as a series of posts. We now commence with those posts:
I psyched myself up and put down the plastic for the next and final major renovation project here: the master bedroom and hallway.
The way I figured it, if I had a pile of lumber in the shop I’d want to do something with it. I didn’t spare much expense in this project although I’m not completely irresponsible with my money. For instance, I’ll be using red oak plywood in much of the window and doorway trim rather than solid oak. That alone will save me several hundred bucks. And while an engineered floor is actually more expensive to purchase than a 3/4″ raw hardwood floor, it’s cheaper to install and maintain while also providing a more durable finish against doggie nails, or so the sales literature says anyway. I made another cut from the original wish list: a day kitchen. The bedroom is actually perfectly located to install one but I couldn’t justify the expense or the real estate it would take. I’ll settle for a beer fridge.
As always, I’ll keep a running photo diary of the project. But here’s an overview of the job:
- Demolition of all the trim in the master bedroom
- Rewire bedroom to a pair of new breakers
- Move the large steam radiator on the inside west wall to two smaller radiators hidden in cabinets under the bay window.
- Extensive plaster renovation + skim coating
- Construct a 5′ high bump-out against the west wall for utilities – finish with red oak rail&stile paneling, capped with red oak shelf
- Construct new 8′ x 4′ closet with overhead cabinets for dead storage
- Strip and refinish existing closet door
- Strip and refinish the existing baseboard trim I want to salvage (because I don’t want to have to build curved baseboards!)
- The room currently has two entrance doors because it used to be two bedrooms. The south facing door will be converted to a pivoting stained glass panel over a knee wall. The east facing entrance will get a renovated solid oak door.
- Rough up and level existing floor
- Install Mannington engineered plank floor, staple-down, Asheville Oak style, in bedroom and hallway
- Rebuild bay window with fresh lumber + two aforementioned radiator cabinets + one raised panel center cabinet, insulate
- Reframe anteroom entrance
- Build pedestals for and install two seven-foot renovated wood columns on either side of anteroom entrance
- Build pair of 28″ closet doors (red oak, style TBD)
- Finish closet interior with cedar paneling
- Rebuild anteroom window trim
- Install custom 8″ baseboards to match existing ones
- Move existing upstairs security system panel from hallway to bedroom
- Install baseboard and door trim + crown mouldings on six hallway doors + three bedroom doors
- Construct custom cabinet for bedroom media system
- Paint, curtains, etc.
- Mannington floor order: $1500 (hoskinghardwood.com)
Master bedroom and hallway lumber order (awaiting quote from Dykes)
| Material | Size | Count |
| Red oak plywood | 3/4″ x 4 x 8 | 5 |
| Doug fir studs | 2 x 3 x 10 | 30 |
| Red oak lumber | 1/2″ x 4 x 10 | 6 |
| 1/2″ x 6 x 14 | 4 | |
| 1 x 6 x 10 | 1 | |
| 1 x 8 x 8 | 6 | |
| 1 x 8 x 14 | 1 | |
| 1 x 2 x 8 | 10 | |
| 5/4″ x 4 x 6 | 1 | |
| Casing #605 | 10′ | 10 |
| 8′ | 24 | |
| Crown #531 | 8′ | 9 |
| Baseboard cap moulding (red oak) #435 | 8′ | 6 |
| 3/4″ quarter round (red oak) | 8′ | 6 |
There’s a lot of detail work here and the holiday season is less than three months away so I’m shooting for an estimated completion date of Feb 15, 2007. This could, and probably will, change based on work demands. If it’s done by the beginning of next spring I’ll be happy. Surprised, actually.
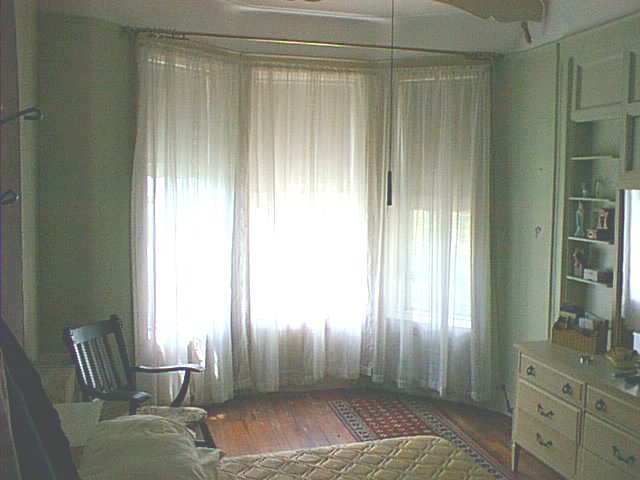
 This picture was taken on inspection day, in April 1998. About the only thing I’ve done to this room since is knock down that wall on the right to expand the room and sand the floors. Oh, and add split unit AC. So this will give you a good idea of the starting point.
![]()
![]()