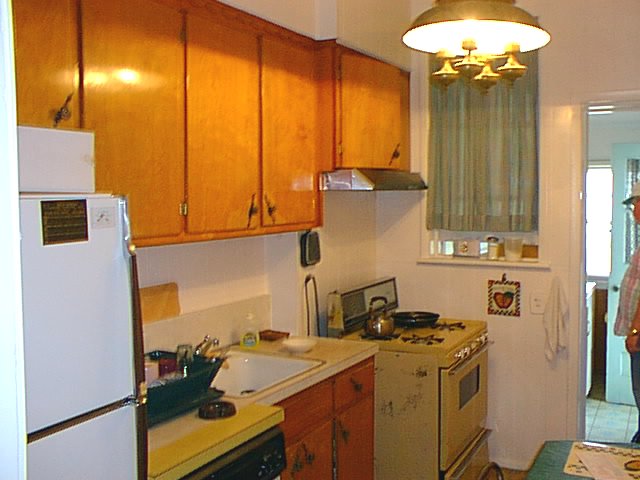
The original kitchen was pretty funky. The cabinets were 1950s vintage and suffering from dry rot. There were no countertop electrical outlets. The ceiling fixture, as I soon discovered, wasn’t even mounted in an electrical box. It was hanging on taped cloth wires. It was depressingly dark, requiring artificial lighting 24 hours a day. But the major problem was no countertop space.
Let's get to work...
Pictorial anthologies have a deceptive way of compressing time, so I’ll be honest here. This job started in early July and wasn’t completed until the following January.
This is a job I had started by a general contractor and his crew because I didn’t want to leave the back of my house open to the elements for the weeks it would have taken me to close it in. Once that was completed, I said goodbye to the pros, cracked my knuckles and went to work.
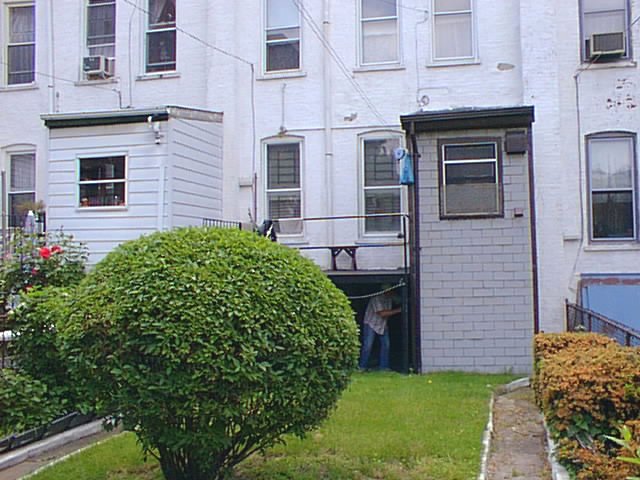
The original rear extension was a drafty laundry room, with a floor that suddenly dropped at a 15 degree angle. It was so riddled with termites that the owner had braced the shed with 2x4s, which were themselves chewed to pulp. It was neither insulated nor heated. There was evidence of old pipe breaks. The large, ugly attachment at the upper right corner is a kitchen vent, the soffet made from sheetrock. There was a mini-rain forest growing in there. I’m still killing centipedes that once called it home.
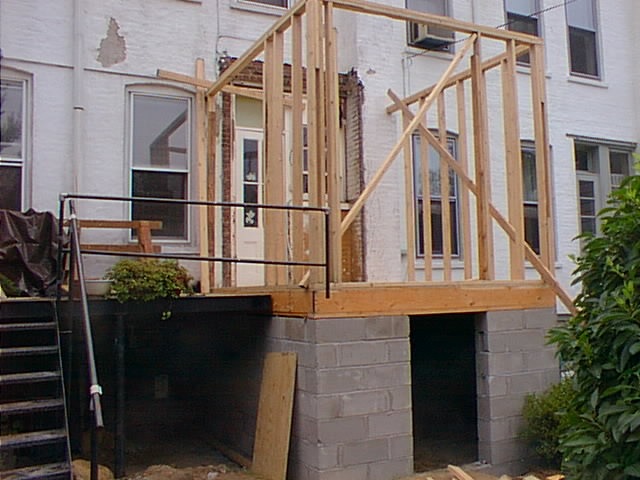
Thanks to the help of fifty generations of termites, the old extension was razed in about thirty minutes. A trench was dug below the frost line to accommodate a concrete and cinder block foundation. Unfortunately, work began on the first day of the hottest ten consecutive days in NYC history.
Due to the heat and despite constant spray from a hose, the foundation set up quickly. I decided to turn the bottom into a tool shed and unheated storage area. The rough framing went up in a day and was braced in anticipation of a thunderstorm due in town that evening.
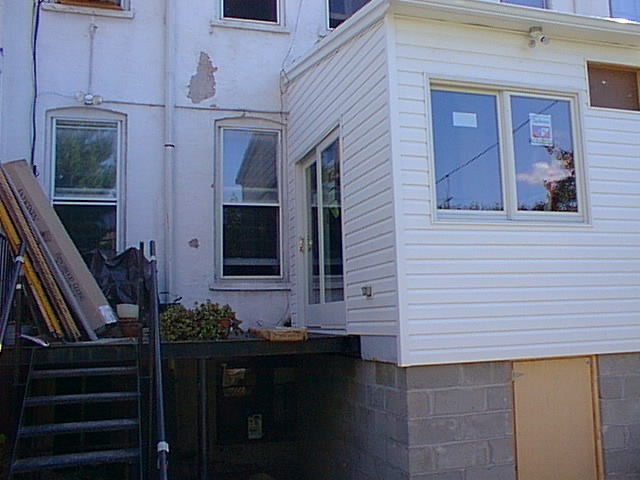
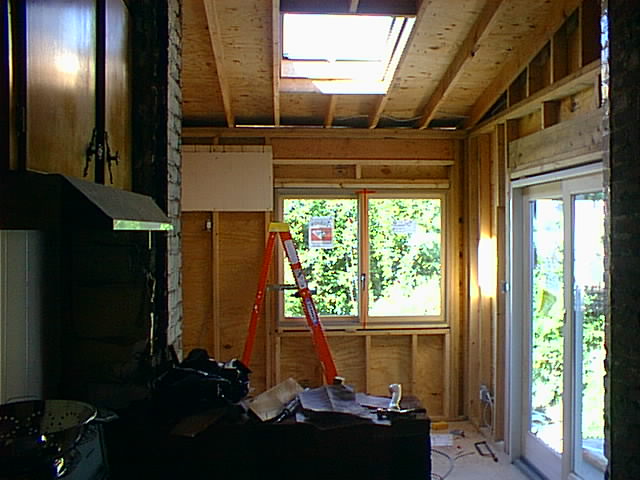
I know, bleh… vinyl siding. But it’s inexpensive, low maintenance, easy to install, and it’s only visible to my immediate backyard neighbors who don’t offer me much of a view either. A six-foot Anderson slider (more about that slider later), a four-foot Anderson window and a five-foot sealed skylight closed it in. Electrical was rerouted for the spotlights and to add another set of spots on the extension. These, like all the house lighting, were computerized with X10 protocol switches, under the command of a Linux server (later upgraded to Insteon devices and an ISY994i).
There was a bit of time between these two shots. In the interim, new thermopane windows were installed along with a whole-house security system. You can see one of the sirens mounted under the soffet. The steel deck was extended three feet so it would be flush with the new extension. The location of the air conditioner was a disappointment. I would have liked it over the window but there wasn’t enough height available because of the upstairs window unless I went with a flat roof.
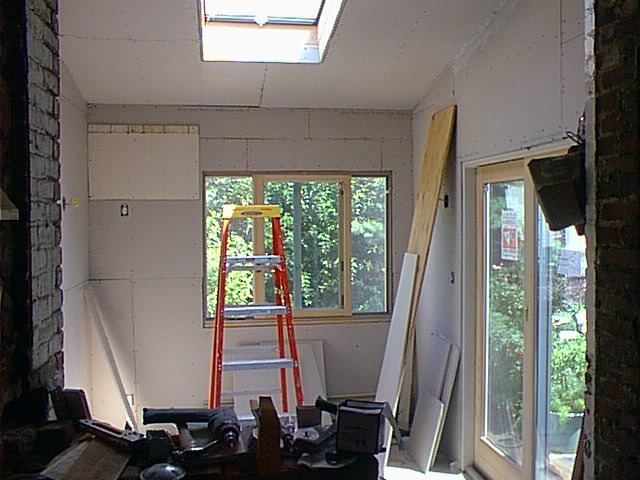
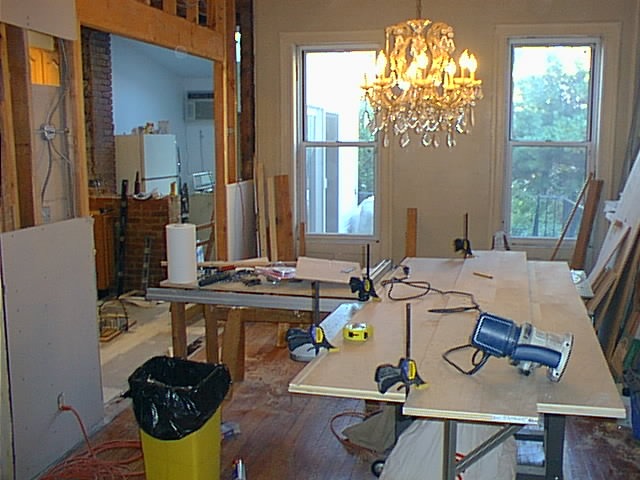
Interior finishing begins. A dedicated 20a circuit feeds the outlets in this room as well as the outside GFCI. A 220VAC outlet was installed for the 18,000 BTU wall air conditioner.
The walls and ceiling were insulated and the sheetrock hung. Purists will be critical of all the small pieces of drywall I used over the window but I under-ordered for this stage. I only owned motorcycles and I didn’t feel like paying a lumberyard $50 minimum to deliver an eight-buck sheet of Type X. I’m pretty good with a taping knife though.
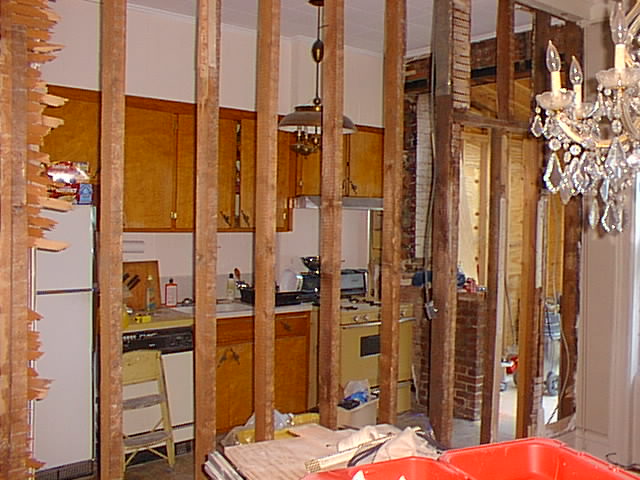
As a solution to a dark kitchen lacking in countertop space, I decided to blow out the wall between it and the dining room. I wasn’t sure at this stage exactly what I wanted to put in that hole, just that I wanted a hole there.
After consulting with an engineer, the wall was found to be “semi-load bearing”. The old floor joists were 2x8s but spanned the building’s width. This wall served mostly to take the bounce out of the second floor.
One of the myriad problems with renovating old houses is lumber dimension. These are real 2x4s while modern 2x4s are actually 1-1/2” by 3-1/2”. That extra half inch means trouble with drywall later so I opted to toss them all out and reframe the wall with new lumber. This wall also had old sheet metal air ducts hidden in them, which is curious because the house has ancient steam heat. This mystery was solved later.
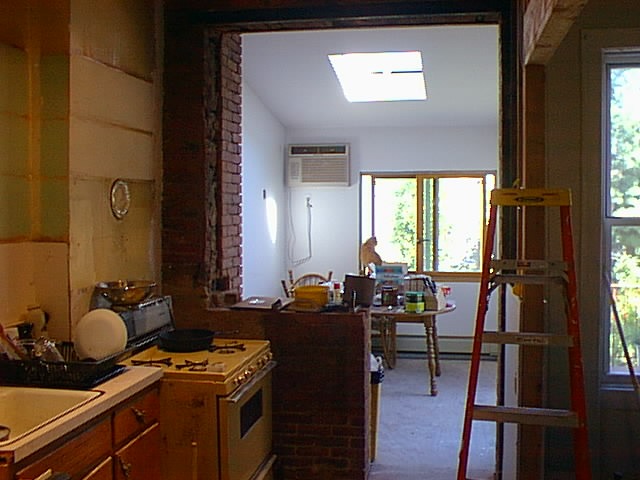
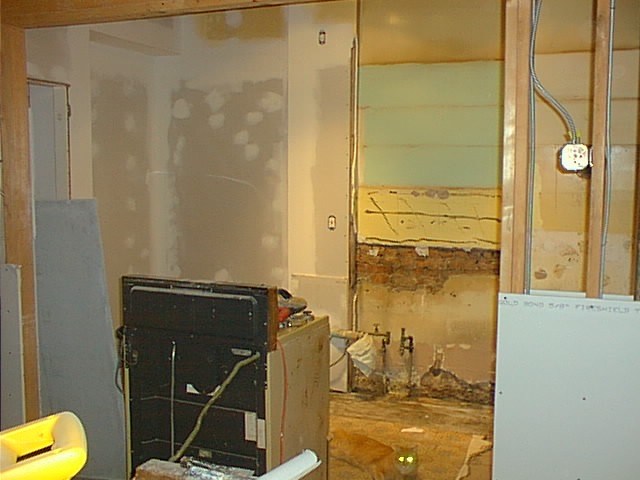
The pass-through is framed and another dedicated 20a circuit is run for the outlets on that wall. The old gypsum ceiling was pulled down and furring strips tacked up to accommodate a tin ceiling. The plaster on the kitchen entrance wall was in such bad shape that I tore it down and reskinned it with drywall. Another 20a line was pulled for the fridge. The old refrigerator was originally sharing a 15a circuit with most of the first floor
Without a doubt, the most miserable job was cleaning the brick in the foreground. Because the new extension is wider than the old one, this was originally outside brick so it had a hundred years of paint, tar, cement parging and ThoroughSeal on it. I used a heat gun, K-Strip, Peel Away, a grinder and four gallons of muriatic acid to get it to this stage. Every steel tool I had in that room rusted just from the fumes! If I had it to do over again, I probably wouldn’t. I still have to tuck point the brick.
The same picture from another perspective. The interior on the extension was skimcoated using a nifty tool called Magic Trowel. Thinking ahead to winter, I added a steam baseboard unit under the window. I’m very glad I did that because the room has five exterior surfaces.
You’ll notice my cat, Chopper, on the window sill. He manages to find his way into a lot of these shots.
The plumbing fun begins. After ripping down the old cabinets, it was like urban archeology: the Yellow Period, the Sea Green Period, the Creosote Period, etc. The pipes and drain were shot. I ran new copper down to the basement and new no-hub drain and vent.
There’s Chopper again.
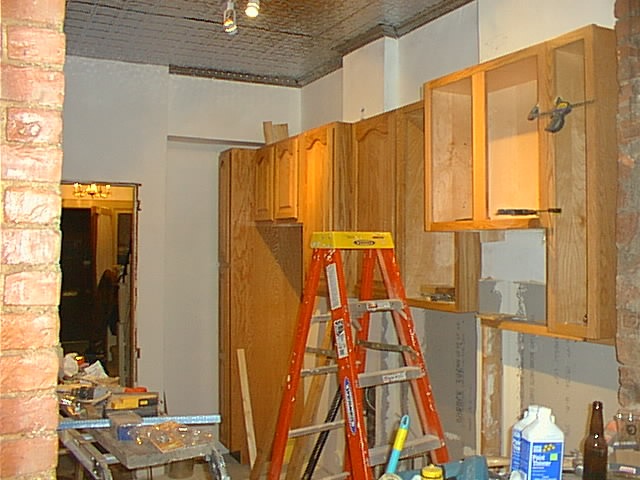
The tin ceiling is almost up, except for some missing crown moulding (yet another under-order). The cement board is on the floor and walls. The new cabinets are being hung.
I was deep into that stage of home renovation where friends knew better than to return my calls so I did this job by myself using temporary scaffolds.
My cabinet workshop. I bet Norm doesn’t have a chandelier in his!
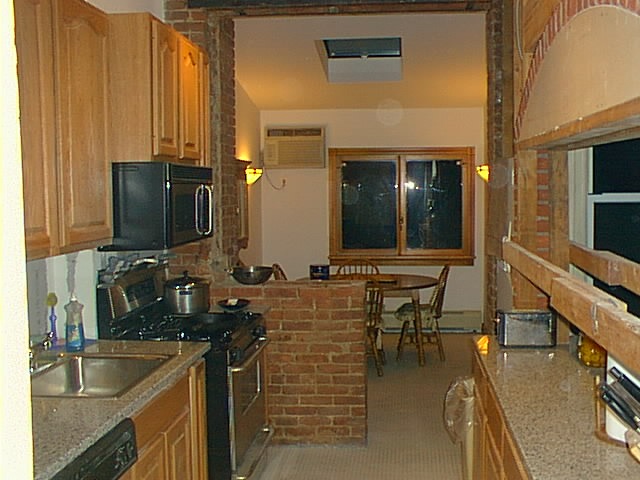
I finally decided what I wanted in that pass-through: a granite counter with a brick eyebrow arch, inspired by a Mexican restaurant I saw in Dallas.
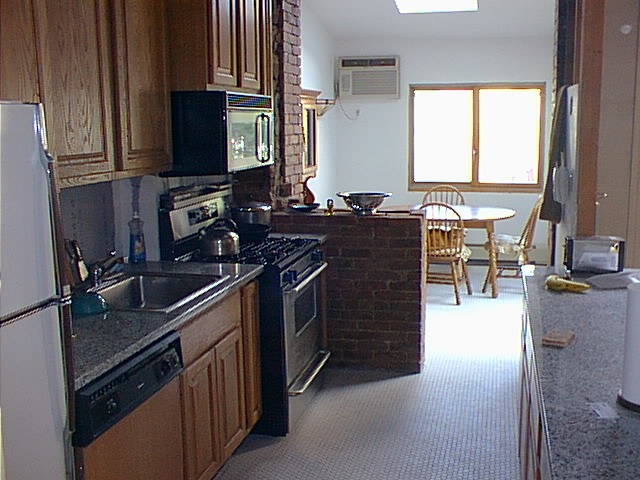
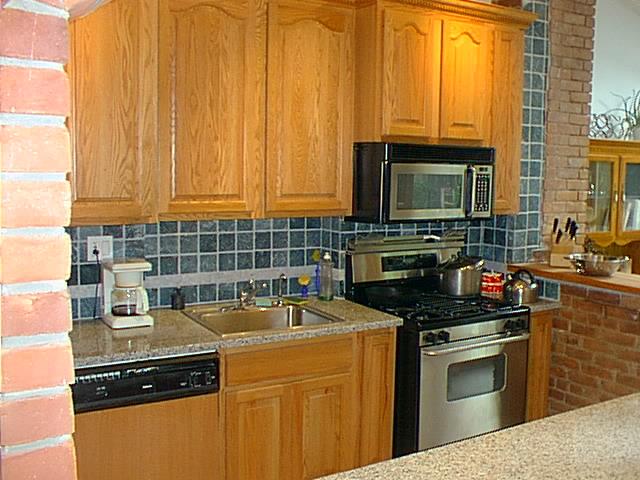
The cabinets are up, the granite is down, cement board is on the floor and walls, and the new appliances are installed. I decided to go with an inexpensive stainless sink for now, figuring that no matter what I used would get destroyed once I started the basement renovation and lost my slop sink. I refaced the existing dishwasher with oak veneer. The original fridge is still working so I decided to put the dollars for a new one elsewhere. Both will be replaced later.
On the granite choice, most people opt for solid color granite. I think this is a mistake. Not only does it wind up looking like an artificial countertop, granite has a tendency to scuff and show waterspots. Patterned granite will hide this and keep looking good for years. Black granite especially is a maintenance queen. It cost me a third the price of solid-black granite too.
The tile floor is down. With the tin ceiling, the natural oak cabinets and the granite counters, I decided to complete the retro ice cream parlor look with one-inch hex tiles. I really wanted a border strip too but was eventually talked out of it by a neighbor because it would draw attention to how narrow the kitchen is.
Here’s a tip I learned the hard way: when working with small tiles like this you’re going to get a lot of thinset oozing in the joints. You’ll make life a lot easier for yourself if you color the thinset to match the color of your grout.
Moulding is added in the extension and the brick eyebrow is up. Then I waited two weeks for the mortar to cure before daring to remove the scaffold over that granite countertop. I wish I’d gone with divided light windows in the back, but it would have delayed closing in the extension for another week.
Crown and dental moulding is added to the cabinets, the walls are hung and skim-coated and the tile is on. Looking at the photos, I think I need to do something special with the addition. It’s too plain.
The tile backsplash is in. I used the same green and 1″ white marble accent tiles that I used on the foyer floor, but with a grey grout to tie it in with the granite countertops. I also built some butcher block to cap that brick kneewall next to the stove. This is the real deal. I made it with 3/4″ maple strips and 3/8″ threaded rod, finished with mineral oil. No glue.
Scroll to Top
Welcome to Brooklyn Row House
This blog is about the challenges of renovating an old (1903) Brooklyn, New York row house.
My last major renovation project was the master bedroom, most of which is about finish carpentry. You’ll find other completed home improvement projects in the Projects submenu at the top of this page.
I’m not a professional builder and don’t pretend to be. I’m just an experienced amateur raised in a family of committed DIYers. I try to closely follow local and national building codes but don’t mistake anything on this site to be professional or even accurate advice! Your mileage may and definitely will vary.
This is the third iteration of BrooklynRowHouse.com, from scratch-built to Drupal and now Wordpress. I hope you enjoy your time here.