At last, some visible progress on the master bedroom renovation. For most of last week and the weekend I repaired plaster, which isn’t very exciting photography. If you can see something it means you didn’t do a very good job of it.
Four years ago, I replaced a termite-ridden center support beam in the basement with a steel I-beam. As careful as we were, there was enough settling that the upstairs plaster took a minor beating. Because these were stress fractures that went all the way through the brown coat, I had to dig out each crack with an old beer can opener and embed mesh tape over it. There’s probably a hundred feet of it buried in these walls. I wonder what plasterers will use when the last of the old fashioned beer can openers disappears into history? It’s perfect for this job.
 Last Thursday, Richie Sessa showed up to replace my freestanding steam radiator with a cast iron convector element, relocated under the center window in the bay. This was a job I decided to leave to a pro because it was tricky. I’m glad I did too because I never would have thought of using an element in this application and even if I had I wouldn’t have had a clue how to solve the problem he ran into with the air valve. With the pitch on the pipe it wouldn’t have fit inside the window enclosure. Richie took off for an hour and came back with a cute li’l button air valve. I’d never seen one before. And it works!
I was concerned because the element is quite a bit smaller than the radiator it replaced. While I don’t know much about heating, I do know that when it comes to steam heat, mass rules. Those heavy honkin’ radiators are heavy for a reason. They store heat and release it for a long time so there are no cold periods between boiler cycles. However, Richie assured me that if I built the enclosure to the specs he gave me that it would work better than what I had. I guess we’ll see in a couple of months. Anyway, I’ll probably start on that cabinetry in a couple of weeks once I settle on a design for the windows.
In the meantime, I did what Richie told me to do: insulate the brick under the windows with two inches of styrofoam sandwiching an air space and sealed as tightly as possible with my new best friend: insulating spray foam! I love this stuff. The enclosure has to be as tight and confined as possible for the convection to work.
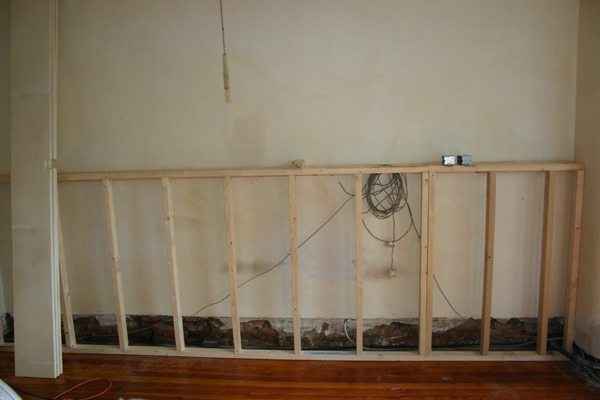
I also got started framing the bump out against the east wall, behind where the bed will be. This will be faced with red oak paneling… again, another TBD design. I’m leaning towards simple judge’s paneling so it doesn’t compete too much with the furniture placed in front of it.
The bump out actually serves two purposes. One is to break up the relatively high (ten foot) ceilings in this room. But mainly it’s to give me a soffit to run the thick satellite, telephone and BX cables and to mount some outlets. The wall is plaster over brick so I didn’t have a lot of options here without chiseling out brick.
If you’ve got a real sharp eye you might see an electrical box on the floor inside that bump out. That was the (1) outlet servicing this room when I moved in… a real nasty one too with crumbling cloth insulation. The box is there only until I dig into the first floor ceiling light box to disconnect it for good.
![]()